Showing posts with label 2016 Holiday Catalog. Show all posts

Tuesday, November 15, 2016

4" Paper Mache Letters Christmas Joy

I have been decorating paper mache letters for every season and occasion for some time.  I was so excited to find these small 4" letters!  I knew that they would be perfect for a hostess gift.


I started by tracing the letter onto This Christmas Designer Series Paper and Red Glimmer Paper then paint the letters with acrylic paint.  While the letters are drying I cut out the paper letters.  I used Tomorrow Multipurpose Adhesive to adhere the paper.  I applied a little Soft Suede ink to the edges with a sponge dauber, it hides the white core of the paper a little.


Embellish as little or as much as you would like.  I used ribbon, charms, rhinestones, fussy cut pieces of Designer Series Paper, and a star cut from the Star of Light Framelits


Have fun making your own letters!

Debbie


Sunday, November 6, 2016

White Christmas Card

I missed a few days of blogging – it's good to be back!  Today I have a Christmas card in shades of white.  Have I mentioned my love for white on white?  I also got to try out the new Stitched Shapes Framelits.  I love them and know you will too! 


While this is mostly Whisper White, I used a Vellum strip punched with the Confetti Stars Punch which adds a little contrast and some texture.  I stamped the snowflake dots from Merriest Wishes  using Versamark and embossed them with Whisper White Embossing Powder and finally die cut it with the largest stitched square framelit from the Stitched Shapes.


The tree is Shimmery White Card Stock and die cut from the Santa's Sleigh Framelits, mounted with Dimensionals.  I put a tiny star at the top of the tree.  The star was punched from the Confetti Stars Punch from Silver Glimmer Paper.  


I stamped the wreath image from Santa's Sleigh and embossed it with Silver.  Die cut it and mounted it onto another circle that was cut from the smallest circle from the Stitched Shapes Framelits.  Not sure I love this element, I'm thinking it should have been a greeting. What do you think?  It was also mounted with Dimensionals.


Thanks for checking out my blog!

Debbie

Shop in my Online Store at your convenience.  Be sure to use the November Host Code XBXTGGM2 when you place your order for $149 or less.  Orders of $150 qualify for benefits you will get automatically!


Saturday, October 29, 2016

Halloween Chocolate Coin Treat Bags

Aren't these the most adorable treat?  This was the make and take at a recent group meeting that I was unable to attend.  But a sweet friend and the hostess made it and saved it for me – thanks Becky of Inking Idaho


 This could be adapted for Christmas as well.


This project uses the Cookie Cutter Halloween set, the matching Cookie Cutter builder Punch, Halloween Night Specialty Designer Series Paper, Tin of Tags (which is a versatile greeting set -- Christmas, birthday, Halloween -- you name it!), Pumpkin Pie & Whisper White Card Stock and the food safe 2"x8" Cellophane bags.


Add some google eyes to this cute skeleton!


Die cut or punch circles from the designer series paper to match the size of chocolate coin you use

You'll have a bowl full of these treats in no time!

Thanks for looking! All supplies can be purchase here

Debbie


Friday, October 21, 2016

Spooky Syringe Pen Treat Card


When I saw a fellow demonstrator use one of these pens on her cute project I knew I had to have some.  I got mine on eBay but I've seen them on Amazon as well.  Mine write in black, but some write in red.  These would make cute gift for a doctor or nurse.


The pen holder was made by cutting a piece of Whisper White Card Stock 2" x 6 1/4".  I scored at 1 1/2,  2 1/4, and 3", and punched a 1/2" circle in the ledge which is where the pen will be held – hopefully the pictures will tell the story.


I didn't want stamping on the ledge so I folded the pieces with the holes to the back while I stamped the drip in Real Red (it is my favorite stamp in the Ghoulish Grunge set)– again I hope the picture explains adequately.  Clearly this would be easier to show in a video and I may get to that soon.


I stamped the drip from Gorgeous Grunge in Real Red on the bottom of the white panel and again in the corner of the card base.  The splat behind trick or treat is also from Gorgeous Grunge. I just got the Labeler Alphabet and used  it to stamp the letters for "Trick or Treat" in Tuxedo Black on a scrap of Whisper White card stock.  That set is going to be fun – this is the first, but certainly not the last, time I've used it.  Makes me want to dig out my old Dymo label maker!  Remember those?


The card base is Whisper White Thick – you'll want the thickness to help support the weight of the pen.  This card fits snugly into the clear envelopes. Those clear envelopes CAN be mailed and you get 50 for $5.00.  I won't mail these, they will be handed out in person!

I hope I've inspired you to start creating!  I'd love you to choose me as your demonstrator and order your Stampin' Up! supplies from my store.  When you order be sure to use the October Host Code 7ZKGME4F  when your order is $149 or less.

Thanks for stopping by my blog!

Debbie

Thursday, October 6, 2016

Paisley Birthday Card

The Paisleys & Posies Bundle in the Holiday Catalog was THE first thing I wanted to order so it was fun to get it out an play with it again today!   


Night of Navy and Whisper White is a combo that makes me happy!  With no layout in mind I stamped and die cut several of the images and just started playing.  I had a pleasing arrangement of paisley elements but need a greeting.  I thought a banner would be just perfect – so I used Birthday Banners and it has a coordinating framelit, Bunch of Banners,  so no fussy cutting!


The base of the card is Night of Navy.  I added a strip of Floral Boutique Washi Tape just above the bottom edge of the Whisper White layer.  The banner was stamped in Night of Navy, the greeting in Basic Black and is mounted with dimensionals.  I used a double thickness in the center, and just glue dots on the out ends.  I added quite a few rhinestones.  The "leaves" behind the round element are scraps from the leaf like element in the Paisley Framelits.


The flower in the lower right corner I cut twice, once from Night of Navy and another from Silver Glimmer Paper -- I filled in the center of the navy flower with a piece of the silver.

Hope you enjoyed this card!

Debbie

When placing an order under $150 from my online store please use the October Host Code,  7ZKGME4F, but if your order is over $150 you will qualify for hostess benefits so don't apply the code.


Wednesday, September 28, 2016

Sweater Weather Fall Birthday Card

It's officially Fall and the leaves are starting to turn beautiful shades of yellow and red here, I'm anxious to get my sweaters out, but it's still 80 degrees so for now I'll settle for the Cable Knit Dynamic Textured Impressions Embossing Folder.  Wow!  That's a mouthful!  This "dynamic" embossing folder embosses a deeper more detailed impression.  It is so beautiful – I think of it as the cashmere of embossing folders.   


I embossed a panel of Very Vanilla Card Stock with the folder and layered that onto a layer of that yummy Copper Foil Sheets.  I so hope this paper is carried over!  I used the Vintage Leaves stamp set and stamped with Versamark 2 oak leaves and 1 maple leaf.  Those leaves were embossed using Copper Embossing Powder and I cut them out with the Leaflets Framelits.  I thought about adding a little color to the leaves, but decided to leave it alone.  


Instead I added some loops of Linen Thread and Copper Metallic Thread and tied the leaves together with a Linen Thread bow.  This "bouquet" was attached with Mini Glue Dots which are the perfect adhesive for dimensional elements like these leaves.


I added a birthday greeting from Build a Birthday, again embossing with Copper Embossing Powder.  I think you could use this for a get well or sympathy or most anything for that matter!  Just wish I could have captured the copper on the leaves a little better but my mobility is still very limited and the light I had just didn't show it.  I snapped this picture with my iPhone on my kitchen counter, which shows the beautiful copper leaves a little better.


Tips:  To make my precious Copper Foil Paper go a bit further, I cut the center out of my panel to save for another project.


You need to get ready for sweater weather and add this embossing folder to your collection!  You will love it. Check out this YouTube video on the embossing folder.


Thanks for looking

Debbie

When shopping online with me use the September Host Code,TYAEUADU, and be sure to check out the Clearance Rack for some great deals!
SaveSave

Saturday, September 24, 2016

Halloween Decor BOO on Linen Canvas Frame


Halloween decorating is so much fun.  I found these cute 4" stretched linen canvases awhile ago at my Michaels store.  By the time I found them they were on clearance and they only had 3.  Wish I had more! (FYI they were by Make Market and described as Decor Linen Canvas 4 in x 4 in) They work well for my favorite Halloween word "BOO".


This project comes together so fast!  I cut 3 1/4" squares from a sheet of Moroccan Designer Series Paper.   I sponged the edges with my sponge dauber and Soft Suede ink.  Then as an afterthought I used my Gold Wink of Stella pen to on the edges as well.


This paper has a great selection of small geometric prints that are so versatile.


I cut the letters from Basic Black Card Stock using my Large Letters Framelits and painted them with the Gold Wink of Stella as well.  I love the gold shimmer on black -- classic Halloween look IMHO.  In the corner of the "B" block I stamped in Memento Tuxedo Black a single spider from the set Jar of Haunts.


On the second "O" I added 3 bats die cut from the Home Sweet Home Thinlits and attached them with scrunched up Mini Glue Dots.


Tried to show the gold shimmer in the photo above.


The panels were attached to the linen with glue dots.  What I love about this is when Halloween is over I will be able to easily remove the panels (and save them for next year) and use the frame for another project.  Is there a 3 letter word for Fall? Spring?  I could use JOY for Christmas, Brr for Winter, Hot for Summer.  Stay tuned.

Thanks for looking!

Debbie

Don't miss the great discounted product in the Clearance Rack!  Use September Host Code TYAEUADU  when you  place your online order


Thursday, September 22, 2016

Pretty Pine Holiday Card in White & Copper

Whew, finally ventured into my stamp room for some therapeutic creating!  I started by embossing the Pine Bough Embossing Folder on Whisper White Card Stock.  You could stop there, but the Pretty Pines Thinlits were within reach and I couldn't resist adding a few branches die cut from scraps of Shimmery White Card Stock. Oh my word I love the Pretty Pines bundle.


The Shimmery White contrasts just enough against the white to add a little more interest.  I cut a couple pinecones from that yummy Copper Foil Paper and ribbons from Real Red Card Stock, both elements from Pretty Pines.  Mounted those elements in the corner with Tombow Multipurpose Adhesive (aka green glue, though the glue isn't green :)


I knew I wanted to hang something from one of the branches.  The Starlight Thinlits have a couple of very small solid stars so I cut one of each from Copper Foil and decided to use the larger of the two. But, it seemed too flat so I grabbed my Pierce Mat and my trusty Paper Snips scissors and used the sharp edge of the scissors to press down and score the back of the little star giving it the dimension I was looking for.


I mounted that little star with part of a Dimensional and hung it with Copper Metallic Thread.  I added the greeting which is from Merriest Wishes (I was running out of energy, and it was right there) and I embossed it with Copper Embossing Powder


While the Shimmery White paper has a little shimmer I used my Clear Wink of Stella pen to frost the tips of the die cut branches and to highlight the embossed branches.  Finally I used Dimensionals to mount this layer onto a base card of Whisper White Thick Card Stock.  I just love this one!  

Thanks for looking! Don't forget to use the September Host Code TYAEUADU when placing an online order.

Debbie

Psst — those Clearance Rack Items are going fast!


Sunday, September 18, 2016

Make a Custom Box & Some Cute Tassels

There are so many possibilities using the simple instructions you see in this video.  Make custom sized boxes and those cute tassels, too!  Perfect for neighbor gifts -- line with some parchment paper and fill with yummy baked goods, candy or caramel corn.


Here are the instructions for the tassels -- easy peasy!


I love the Fancy Frost Specialty Designer Series Paper used for the box tops.  The Bakers Twine Trio in the Holiday Catalog would be a beautiful choice for the tassels.

Tip -- Stampin' Up! recommends Fast Fuse Adhesive for these boxes and in the video there is a tip for getting the best results with applying Fast Fuse by changing your grip.

Thanks for looking!  I hope to have personal projects to share again soon but I'm recovering from some major foot surgery and getting around just isn't easy right now.

Debbie

Be sure to check the Clearance Rack -- many new items were just added!


Wednesday, September 14, 2016

Glamper Greetings - The Little Pink Trailer


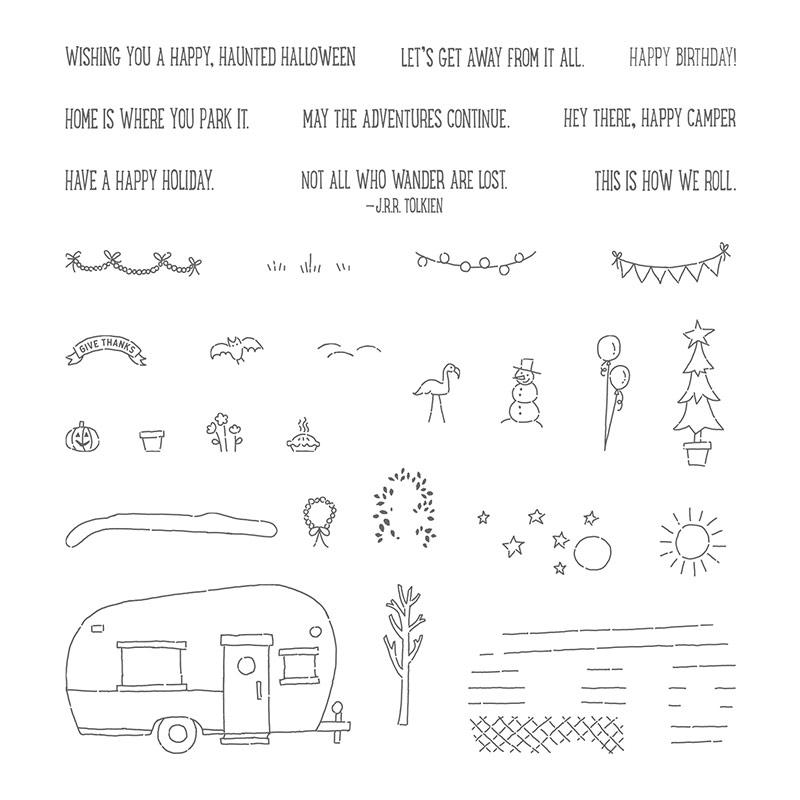
This adorable stamp set is a new favorite of mine.  Glamper Greetings is available now in the Holiday Catalog.  You    Will    Want    This    One!


Which reminds me The Host Code for September is TYAEUADU.  So when you place an online order (except if your order is $150 or more of product) with me be sure to enter that in the box on the bottom left of this page:


Look at all the fun accessories and greetings for this cute little trailer.
I fussy cut the trailer and used dimensionals to pop it off the page.  It's colored with Blushing Bride, Flirty Flamingo and Basic Black markers.


The trailer is "parked on" a strip of Washi Tape from the Affectionately Yours set, which is on top of part of a Delicate White Doily.  Under all that I used the Clear Wink of Stella to add some glimmer. Truth be told I used a Decorative Mask that is no longer available and the leaf pattern from the Seasonal Decorative Masks would have been a better choice.  Oh well, too late now...


I added some loops of Silver Metallic Thread under the greeting banner and some Rhinestone Basic Jewels. I punched a hole out of the round window in the door and put some Window Sheet behind it. Because this is a photopolymer set it was easy to precisely place the pie in the window (it's an apple pie just in case you wondered).

Look at these cards made by Stampin' Up! Concept Artists


Thanks for looking!  I know you will want this set

Debbie


Shop 24/7 from my online store.  Don't forget to check great deals in the Clearance Rack, new items were just added on September 13.

Saturday, September 10, 2016

BOO! Halloween Card


There was an Pumpkin Pie "O" die cut sitting on my desk, and it made me think of a pumpkin so I ran with the idea. I grabbed the Large Letter Framelits and cut the rest of the word. These pumpkins won't scare anyone though.


The Woodland embossing folder  embossed on Tip Top Taupe provides the background.  I only embossed the top 3/4.  The "ground" is Always Artichoke cut from the Swirly Scribbles Thinlits.  I stamped the stem from the Jar of Haunts in Basic Black and used my Blender Pens to add a little color.


To make the embossed trees stand out a little more I used an Aqua Painter to highlight the raised parts then used the Clear Wink of Stella for the lines in the trees.  While I love my little pumpkins, turns out the trees are my favorite element on this card.


Base card is Always Artichoke, the top layer is Tip Top Taupe layered onto Basic Black

Thanks for looking!

Debbie

Shop 24/7 from my online store.  Don't forget to check great deals in the Clearance Rack

Thursday, September 8, 2016

Spooky Halloween Jar of Haunts Card

The Halloween set Jar of Haunts has been begging to be used.  The floating eyeballs are my favorite element and the Ghoulish Grunge set is a perfect compliment. Both are in the new Holiday Catalog.


The brick element from Ghoulish Grunge was stamped repeatedly in Sahara Sand onto Very Vanilla Card Stock.  I stamped the cheesecloth in Versamark and embossed it with Whisper White Embossing Powder then I grunged the layer up with a Sponge Dauber and Soft Suede Ink.  The drip is stamped in Cherry Cobbler. The jar and eyeballs were stamped with Jet Black Stazon onto Window Sheets.


To ground the jar so it isn't just floating on the page I added a trimmed piece of 5/8" Burlap Ribbon and some Black Bakers Twine to create the shelf.  The tag was stamped using part of a greeting from Glamper Greetings onto a narrow strip of Very Vanilla. 


I used my Chalk Marker to color on the back of the eyeballs -- the white added contrast and just made them stand out a little more. The base is Cherry Cobbler Card Stock.

Thanks so much for looking! 

Debbie  

Shop 24/7 from my online store.  Don't forget to check great deals in the Clearance Rack

Tuesday, September 6, 2016

Copper Graffiti Birthday Card

It's only September but that is when I start thinking about birthday cards for the guys in my family 'cause October comes and there is one guy birthday after another.  I'll be making lots more of this card!  Yep, they'll all get the same one.


This one uses one of my favorite techniques — sort of a variation of "kissing"!  Ink up the stamp, I inked the Watercolor Wash background with Sahara Sand ink, then stamped it onto the Brick Wall embossing folder (stamp onto the side without the Sizzix word).  It leaves the brick design on the background.  Then stamp it onto the Very Vanilla layer.


The greeting is the "happy birthday" from the Watercolor Words set. It was stamped in Versamark then used my Heat Tool to emboss with Copper Embossing Powder from the 2016 Holiday Catalog. Oh my word that copper is beautiful! The combo makes me think of graffiti.


For a really simple card you could leave it alone at this point but I thought a little embellishment would be fun. This is 5/8" Burlap Ribbon, frayed, 3 loops of Copper Thread and a Pretty Pines Thinlits branch cut out of Copper Foil all attached with a couple of staples.


The base card is Crumb Cake, the stamped layer is Very Vanilla layered onto Copper Foil.  The Copper Foil is too precious to "waste" so I cut the middle out of my layer.


Tip:  Before embossing, rub the Embossing Buddy over the paper, It will give you the cleanest surface for embossing.

Thanks for looking!

Debbie

Shop 24/7 from my online store.  Don't forget to check great deals in the Clearance Rack