Monday, September 12, 2016

Clean and Simple (CAS) Copper Leaves Thank You Card

This card is inspired by a card I saw on Pinterest — it didn't use Stampin' Up! product but I knew I could make it with my SU supplies.  I love cards with lots of white space but I also love embellishments.  I resisted adding anything else to this card, leaving all that glorious white space.  The photo is a little wonky so I could get the copper to show.


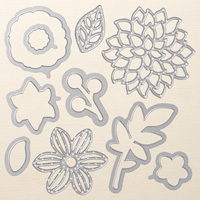
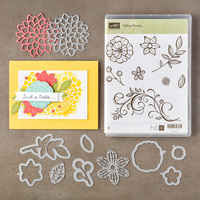
Start with a base of Thick Whisper White.  With a pencil I hand drew an arc.  Using the leaf from the May Flowers Framelits I cut the leaf 3 times at varying angles then trimmed the lower right edge off with my Paper Snips.

May Flowers Framelits Dies Falling Flowers Clear-Mount Bundle

From the Copper Foil paper I cut 3 more leaves.  I embossed a 4 1/4 x 5 1/2 piece of Whisper White with the Woodgrain Embossing Folder and adhered it to the back side of the front of the card.  Then adhered the copper leaves with Tombow Multipurpose Adhesive .


Emboss the greeting with Copper Embossing Powder.  I used the thank you from Thoughtful Banners.  That's it!  Fast, easy, elegant  — change the greeting to whatever you need!


Tip:  The cool thing about using photopolymer stamps, as I did here, is they can be shaped a little.  I added just a little curve to the greeting to match the line of the arc.

Thanks for looking!

Debbie

Shop 24/7 from my online store.  Don't forget to check great deals in the Clearance Rack

Saturday, September 10, 2016

BOO! Halloween Card


There was an Pumpkin Pie "O" die cut sitting on my desk, and it made me think of a pumpkin so I ran with the idea. I grabbed the Large Letter Framelits and cut the rest of the word. These pumpkins won't scare anyone though.


The Woodland embossing folder  embossed on Tip Top Taupe provides the background.  I only embossed the top 3/4.  The "ground" is Always Artichoke cut from the Swirly Scribbles Thinlits.  I stamped the stem from the Jar of Haunts in Basic Black and used my Blender Pens to add a little color.


To make the embossed trees stand out a little more I used an Aqua Painter to highlight the raised parts then used the Clear Wink of Stella for the lines in the trees.  While I love my little pumpkins, turns out the trees are my favorite element on this card.


Base card is Always Artichoke, the top layer is Tip Top Taupe layered onto Basic Black

Thanks for looking!

Debbie

Shop 24/7 from my online store.  Don't forget to check great deals in the Clearance Rack

Thursday, September 8, 2016

Spooky Halloween Jar of Haunts Card

The Halloween set Jar of Haunts has been begging to be used.  The floating eyeballs are my favorite element and the Ghoulish Grunge set is a perfect compliment. Both are in the new Holiday Catalog.


The brick element from Ghoulish Grunge was stamped repeatedly in Sahara Sand onto Very Vanilla Card Stock.  I stamped the cheesecloth in Versamark and embossed it with Whisper White Embossing Powder then I grunged the layer up with a Sponge Dauber and Soft Suede Ink.  The drip is stamped in Cherry Cobbler. The jar and eyeballs were stamped with Jet Black Stazon onto Window Sheets.


To ground the jar so it isn't just floating on the page I added a trimmed piece of 5/8" Burlap Ribbon and some Black Bakers Twine to create the shelf.  The tag was stamped using part of a greeting from Glamper Greetings onto a narrow strip of Very Vanilla. 


I used my Chalk Marker to color on the back of the eyeballs -- the white added contrast and just made them stand out a little more. The base is Cherry Cobbler Card Stock.

Thanks so much for looking! 

Debbie  

Shop 24/7 from my online store.  Don't forget to check great deals in the Clearance Rack

Tuesday, September 6, 2016

Copper Graffiti Birthday Card

It's only September but that is when I start thinking about birthday cards for the guys in my family 'cause October comes and there is one guy birthday after another.  I'll be making lots more of this card!  Yep, they'll all get the same one.


This one uses one of my favorite techniques — sort of a variation of "kissing"!  Ink up the stamp, I inked the Watercolor Wash background with Sahara Sand ink, then stamped it onto the Brick Wall embossing folder (stamp onto the side without the Sizzix word).  It leaves the brick design on the background.  Then stamp it onto the Very Vanilla layer.


The greeting is the "happy birthday" from the Watercolor Words set. It was stamped in Versamark then used my Heat Tool to emboss with Copper Embossing Powder from the 2016 Holiday Catalog. Oh my word that copper is beautiful! The combo makes me think of graffiti.


For a really simple card you could leave it alone at this point but I thought a little embellishment would be fun. This is 5/8" Burlap Ribbon, frayed, 3 loops of Copper Thread and a Pretty Pines Thinlits branch cut out of Copper Foil all attached with a couple of staples.


The base card is Crumb Cake, the stamped layer is Very Vanilla layered onto Copper Foil.  The Copper Foil is too precious to "waste" so I cut the middle out of my layer.


Tip:  Before embossing, rub the Embossing Buddy over the paper, It will give you the cleanest surface for embossing.

Thanks for looking!

Debbie

Shop 24/7 from my online store.  Don't forget to check great deals in the Clearance Rack


Saturday, September 3, 2016

Pretty Paisleys Thank you Trio

The new Pretty Paisleys Embossing Folder in the Holiday Catalog is perfect for simple but elegant cards.  I used it to frame the thank you greeting from One Big Meaning.  I even used the embossing folder to emboss the envelopes -- I just used my bone folder to carefully take the envelope apart so I could emboss just the front.


I think my favorite version is the one I added a touch of color to the raised embossing.  I used Stampin' Write Markers in Pear Pizzazz, Blushing Bride and a touch of Rose Red.  You could just as easily use a Blender Pen.


The exclamation point cried out to me for a Rhinestone dot so I added one to each card.


On one of the cards I cut out the embossed frame and used dimensionals to elevate it a little off the page.  This card is mounted onto Basic Black so I lined it with a Whisper White layer.  I wanted a little something but didn't want it to be a stamped image so I used the line and dot die from the Detailed Santa Thinlet.  It was just the right touch!

Don't forget the weekly specials!  Here is what is offered this week.  New items will be added at midnight each Thursday of the promotion period.  Don't miss a single one.  I love, love, love, the Blossom Builder Punch

Thanks for looking! 

Debbie

Shop 24/7 from my online store.  Be sure to check out the great items in the Clearance Rack


SaveSaveSaveSaveSaveSaveSaveSaveSaveSaveSaveSaveSaveSaveSaveSaveSaveSaveSaveSave

Friday, September 2, 2016

Detailed Santa Thinlit Ornament


This idea has been rattling around my brain since I saw this Greetings From Santa Bundle in the Holiday Catalog.


I used my Big Shot (it's getting a real work out these days) to cut the Detailed Santa Thinlit from white printer paper (I find that card stock doesn't like to be rolled) then I cut a circle from that die cut.  I cut another circle the same size from a Window Sheet.  This clear ornament is one I purchased at a big box craft store. For it the circle I needed was about 3 3/8" diameter (I used the one from the retired Circles Collection Framelits) which fit perfectly.


The die cut santa was glued to the window sheet circle with Tombow Multipurpose Adhesive  (green glue).  I let it dry then carefully rolled the pair and inserted them into the ornament.  I added a mixure of Dazzling Diamond Glitter and the new White Mica Flakes -- just a little bit in the bottom.


That's it!  Honestly the hardest part was photographing it and I need to keep trying to get a better one.

Tip:  Stampin' Up! recommends using the Precision Base Plate with this detailed thinlit.  

Thanks for looking!

Debbie

Shop 24/7 from my online store.  Don't forget to check great deals in the Clearance Rack

Thursday, September 1, 2016

New Holiday Catalog & Special Offers

HolidayPreOrder_DemoSite_CatalogPage_US

All of the wonderful things in Holiday Catalog 2016 are available now! Yippee. Yes! You can order now!  I hope you have enjoyed my sneak peeks and that they sparked your creativity.  You will find products and projects for Halloween, Thanksgiving, Fall, Winter, Christmas, and New Years!

Stampin' Up! also has a few products from the Annual Catalog at 25% off -- might be just what you have been waiting for!

In case you haven't already seen them here are some videos showcasing some of the product.


What is your favorite?  Hard to pick, for sure!

Thanks for looking!  Have fun looking at the new catalog! 

Debbie

Shop 24/7 from my online store.  Don't forget to check great deals in the Clearance Rack